[Rust] tonic을 통한 gRPC 구성

 tonic은 gRPC의 rust 구현체다.
grpc는 구글에서 만든 고성능의 통신 프로토콜로, 기존에 주로 사용하던 웹 프로토콜인 HTTP와 대비된다.
HTTP이 텍스트 기반으로 구성된 것과 다르게 바이너리 형식으로 데이터를 주고받아 훨씬 효율적이란 특징이 있다.
grpc의 주요 사용처는 마이크로 서비스 아키텍처(MSA)에서 시스템들 사이의 징검다리를 놔주는 것이다.
브라우저 통신에도 사용할 수는 있지만 브라우저 지원 수준에 따라 사용이 불가능할 수도 있다.
프로젝트 생성 및 설정
우선 cargo 커맨드로 서버와 클라이언트 프로젝트를 하나씩 만들어준다.

그리고 종속성은 다음과 같이 tonic과 tokio, tonic_build, prost 정도가 필요하다.
받는 쪽, 보내는 쪽 둘다.
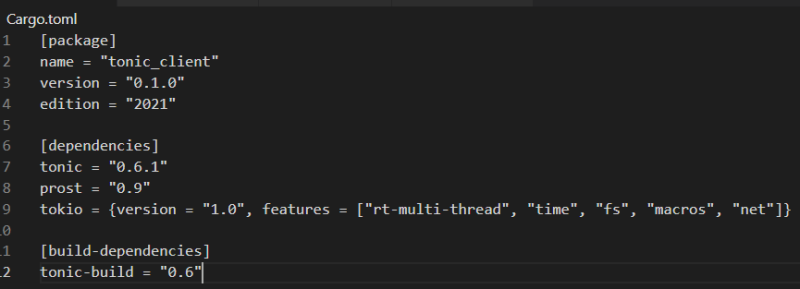
[dependencies]
tonic = "0.6.1"
prost = "0.9"
tokio = {version = "1.0", features = ["rt-multi-thread", "time", "fs", "macros", "net"]}

[build-dependencies]
tonic-build = "0.6"
tokio는 rust 환경에서 가장 널리 사용되는 비동기 런타임이고, tonic도 tokio를 기반으로 구성되어있기 때문에 필요하다.
tonic_build와 prost는 proto 파일 분석에 사용된다.
proto 정의
grpc에서 가장 큰 축을 차지하는 것 중 하나가 프로토콜의 정의다.
grpc는 다른 언어로 구성되어있는 시스템 간에도 원활하게 소통이 가능한 것을 지향하기 때문에, 프로토콜 정의도 하나로 못박아뒀다. 한번만 짜면 공유해서 사용할 수 있게끔 말이다.
자세한 것은 별도 포스트나
https://blog.naver.com/sssang97/222574263116
다른 자료들을 참고하길 바란다.
내 경우엔 아래와 같이 프로토파일을 구성했다.
syntax = "proto3";

package tutorial;

// 서비스 정의
service Foo {
  // 함수 정의
  rpc Add (AddRequest) returns (AddReply);
}

// 요청 파라미터 정보
message AddRequest {
  int32 lhs = 1;
  int32 rhs = 2;
}

// 응답 파라미터 정보
message AddReply {
  int32 result = 1;
}
Foo라는 간단한 서비스 하나에 정수 덧셈을 처리해주는 단순한 함수 하나만 넣어뒀다.
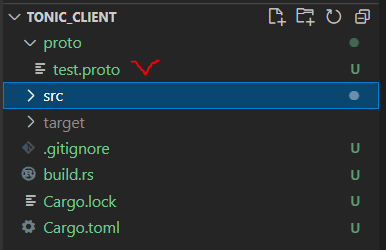
저걸 아래와 같은 식으로 각각의 프로젝트 폴더에 배치한다.
그리고 프로젝트 루트 경로에 build.rs라는 파일을 둬서, 다음과 같이 정의한 proto 파일을 컴파일할 수 있도록 한다.
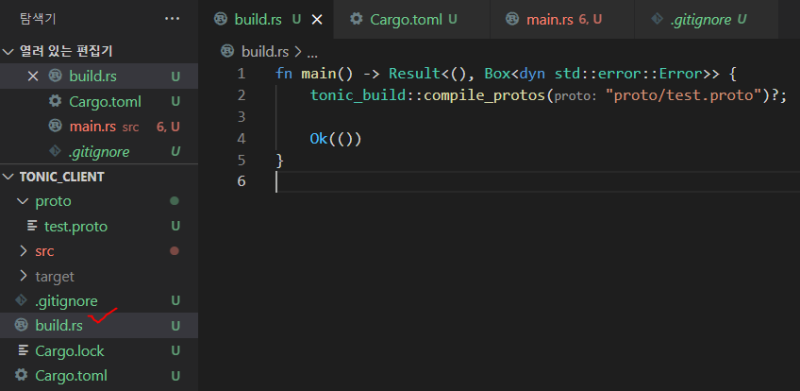
fn main() -> Result<(), Box<dyn std::error::Error>> {
    tonic_build::compile_protos("proto/test.proto")?;

    Ok(())
}
그럼 tonic_build가 proto 파일을 분석해서 rust에서 사용할 수 있는 형태로 자동으로 제공해줄 것이다.
서버 구성
규격은 만들어놨으니 서버를 먼저 구성해보자.
가장 먼저 해야할건 proto를 include하는 것이다.
그건 다음과 같이 할 수 있다.
pub mod tutorial {
    tonic::include_proto!("tutorial");
}
이러면 현재 tonic_build를 통해 빌드된 프로토 파일 중에서 tutorial이라는 이름의 패키지를 가져와준다.
방금 우리가 위에서 정의한 저것 말이다.
그럼 우린 다음의 형태로, tonic_build가 자동 생성해준 proto 정의들을 가져다 쓸 수 있다.
use tutorial::foo_server::{Foo, FooServer};
use tutorial::{AddReply, AddRequest};
foo_server라는 모듈명은 서비스 정의 "Foo"를 스네이크 케이스로 바꿔서 + server를 바꿔준 형태로 생성된 것이고, 그 안에는 서비스를 트레잇으로 만들어준 Foo, 그리고 그걸 올리기 위한 FooServer가 들어있다.
AddReply, AddRequest는 위에서 정의한 응답과 요청 형식이다. 구조체로 제공된다.
자, 그럼 저걸 기반으로 서버 로직을 구현해보자.
#[derive(Default)]
pub struct TestServer {}

#[tonic::async_trait]
impl Foo for TestServer {
    async fn add(&self, request: Request<AddRequest>) -> Result<Response<AddReply>, Status> {
        println!("Got a request from {:?}", request.remote_addr());

        let request = request.into_inner();
        let lhs = request.lhs;
        let rhs = request.rhs;

        let result = lhs + rhs;

        println!("덧셈 처리: {} + {} = {}", lhs, rhs, result);

        let reply = AddReply { result: result };
        Ok(Response::new(reply))
    }
}
먼저 Foo 인터페이스를 구현할 TestServer 구조체를 만들고, 그 안의 함수를 구현했다.
그렇게 특별할 것은 없다.
요청을 받아서, 그 값을 기반으로 덧셈을 처리, 응답을 보내주도록 했다.
그리고 main 함수를 다음과 같이 구성했다.
#[tokio::main]
async fn main() -> Result<(), Box<dyn std::error::Error>> {
    let addr = "[::1]:50051".parse().unwrap(); // 서버를 열 주소:포트
    let test_server = TestServer::default(); // 서버 생성

    println!("Test Server listening on {}", addr);

    Server::builder()
        .add_service(FooServer::new(test_server))
        .serve(addr)
        .await?;

    Ok(())
}
tonic은 tokio 기반의 시스템이라 항상 #[tokio::main]으로 엔트리포인트를 감싸줘야 한다.
서버 객체를 생성하고, 그걸 열어줄 주소를 정의하고, Server 빌더를 통해 넣어주면 된다.
여기서는 서버를 하나만 넣었지만 원하는만큼 더 넣을 수도 있다.
전체 소스는 다음과 같다.
pub mod tutorial {
tonic::include_proto!("tutorial");
}
use tonic::{transport::Server, Request, Response, Status};
use tutorial::foo_server::{Foo, FooServer};
use tutorial::{AddReply, AddRequest};
#[derive(Default)]
pub struct TestServer {}
#[tonic::async_trait]
impl Foo for TestServer {
async fn add(&self, request: Request<AddRequest>) -> Result<Response<AddReply>, Status> {
println!("Got a request from {:?}", request.remote_addr());
let request = request.into_inner();
let lhs = request.lhs;
let rhs = request.rhs;
let result = lhs + rhs;
println!("덧셈 처리: {} + {} = {}", lhs, rhs, result);
let reply = AddReply { result: result };
Ok(Response::new(reply))
}
}
#[tokio::main]
async fn main() -> Result<(), Box<dyn std::error::Error>> {
let addr = "[::1]:50051".parse().unwrap();
let test_server = TestServer::default();
println!("Test Server listening on {}", addr);
Server::builder()
.add_service(FooServer::new(test_server))
.serve(addr)
.await?;
Ok(())
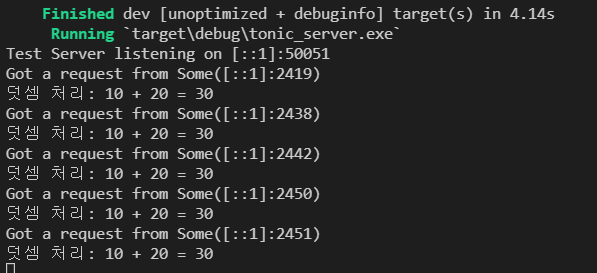
}정상적으로 잘 설정됐다면, 다음과 같이 실행이 될 것이다.

이제 클라이언트로 가보자.
클라이언트 구성
클라이언트는 비교적 더 간단하다.
동일하게 proto를 include하고
pub mod tutorial {
    tonic::include_proto!("tutorial");
}
다음과 같은 형태로 요청을 보낼 수 있다.
use tutorial::foo_client::FooClient;
use tutorial::{AddReply, AddRequest};

#[tokio::main]
async fn main() -> Result<(), Box<dyn std::error::Error>> {
    let mut client = FooClient::connect("http://[::1]:50051").await?;

    let request = tonic::Request::new(AddRequest { lhs: 10, rhs: 20 });

    let response: tonic::Response<AddReply> = client.add(request).await?;

    println!("RESPONSE={:?}", response.into_inner());

    Ok(())
}
FooClient::connect로 요청을 보낼 주소를 지정해서 클라이언트 커넥션을 만들고, add 함수를 호출해서 응답을 받아온다.
전체 소스는 이렇다.
pub mod tutorial {
    tonic::include_proto!("tutorial");
}

use tutorial::foo_client::FooClient;
use tutorial::{AddReply, AddRequest};

#[tokio::main]
async fn main() -> Result<(), Box<dyn std::error::Error>> {
    let mut client = FooClient::connect("http://[::1]:50051").await?;

    let request = tonic::Request::new(AddRequest { lhs: 10, rhs: 20 });

    let response: tonic::Response<AddReply> = client.add(request).await?;

    println!("RESPONSE={:?}", response.into_inner());

    Ok(())
}
그럼 클라이언트에서 이런 식으로 값을 받아올 수 있고
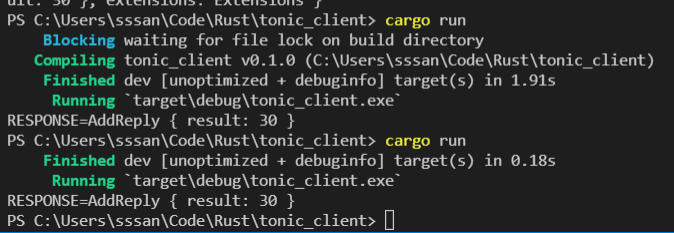
서버에서는 요청을 잘 받아서 쏴줄 것이다.
그렇다.
예제 프로젝트 코드
https://github.com/myyrakle/Rust-Example/tree/main/src/thirdparty/tonic
참조
https://docs.rs/tonic/0.6.1/tonic/
https://developers.google.com/protocol-buffers/docs/proto3